Here are some photos and description of how I made it.
The main part of the case, as shown above, is made by using 24 hour Araldite (full-strength epoxy resin) to join a 3mm thick bottom plate to four sides, each of which is comprised of two lengths of 6mm wide extrusion. A similar piece of 3mm sheet is the lid - and is held in place by four 1/8" Whitworth countersunk screws. Not visible are the 5/32" Whitworth holes tapped in the side by which I mount it into the PC chassis. This could fit in two 5 1/4" drive bay slots, but I prefer to mount it inside the case somewhere, not near the drive bays. For instance, with some simple styrofoam packing, the case could go into a double slot. In one of these machines the case is bigger than this - to take two drives, although it only has one at present. In that instance, I wrapped the entire case in 4 mm foam to reduce noise further - leaving only gaps for the end with the cable and air exit holes. That case has a rotary ordinary fan (ball bearing) inside to circulate the air and provide pressure to make it flow from inlet holes at one end of the case to exit holes at the other. This has been working fine for years. The two later cases are like this one.
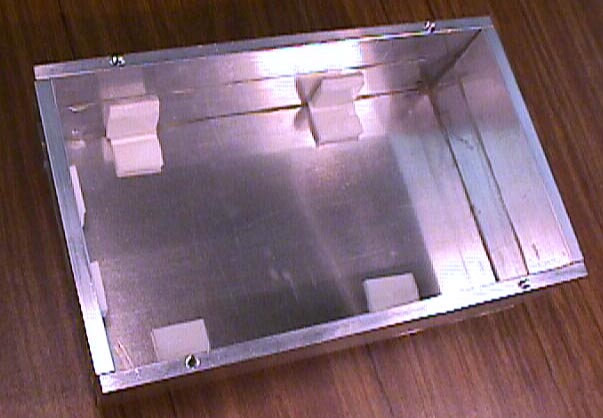
The two 9 mm holes are for the exit of cooling air.
Inside the case, I have affixed some small pieces of 4mm thick foam plastic with thin double-sided adhesive tape to hold the drive. I am not sure what sort of foam it is - but it is smooth, slippery and easy to melt, so maybe it is polyethylene. There are many types of foam which would work fine. The idea is that the drive is not rigidly mounted, but also that it is not going to move more than a mm or so in any direction.
The aluminium pieces are:
3mm sheets: Two: 122 x 190 mm.
32 x 6 mm extrusions:I stuck them together with Araldite, then taped them together with masking tape. Then I popped the case into the oven on moderate heat so the epoxy cured in half an hour or so. The tape doesn't work very well at high temperatures, so I kept it not too hot and kept an eye on it.
Two: 110 mm25 x 6 mm extrusions:
Two: 190 mm
Two: 110 mm
Two: 190 mm
Then I drilled the 9mm end holes and drilled and tapped the holes in the lid and the main case for the four 1/8" Whitworth screws.
The next step involves mounting a suitable centrifugal fan in the lid. Ordinarily really good centrifugal fans are quite expensive, such as the beautiful Panasonic / Matsushita Scirocco blowers, one of which is: http://www.panasonic.com/industrial_oem/electronic_components/pdf/fal5f.pdf The Panasonic site is hard or impossible to navigate, but the search engine got me to the home page for these blowers: http://www.panasonic.com/industrial/appliance/appliance_fans_blowers.htm . I bought some of these from Digikey, and use the smallest one to force air into my laptop from beneath (I have the power supply permanently mounted under it too, so the machine is tilted ready for use.) See http://info.digikey.com/T012/V4/649.pdf for the Digikey catalogue page..
The curves in the PDF files show that the pressure is higher than theThe fans I used were Niganagawoki brand (i.e. generic mass PC market from China or Taiwan) and are particularly well suited to this task, because they are thin and have quite a wide diameter. These fans are sold with a metal piece to mount in an empty slot of a PC to extract air from the PC. Here is a picture of the one I used (on the right) and another similar type which would be OK too. Some fans with the same external dimensions are not really centrifugal blowers, but have more ordinary propeller-like fan blades. I don't recommend these.
average propeller-type fan:
http://www.panasonic.com/industrial/components/pdf/fal5f.pdf
http://www.panasonic.com/industrial/appliance/pdf/fba08a.pdf
I discussed these blowers on the Silent PC discussion list: http://groups.yahoo.com/group/Silent-PC/messages/1310 in November 2001.

Fans vary a lot in their noise characteristics. Some create large amount of noise as they switch their electromagnets on and off to drive the magnets in the rotor. These fans were AUD$15 to AUD$20 (USD$10 or less) so its OK to buy a few types and find the one which is quietest. Centrifugal blowers are almost always quieter and more efficient than the propeller fan type. The propeller type relies on the air having no rotational velocity on entering or leaving, because it hits the air diagonally in order to move it longitudinally. But if there is little airflow, then the air in the vicinity of the fan simply spins around with the blades and so there is little pressure to move it through the fan. Centrifugal blowers are completely different. They spin the air and then the air is constrained, under pressure of its own rotation, unless it exits the fan housing. The lower the flow the greater the pressure.
The next photo shows my wiring arrangement.
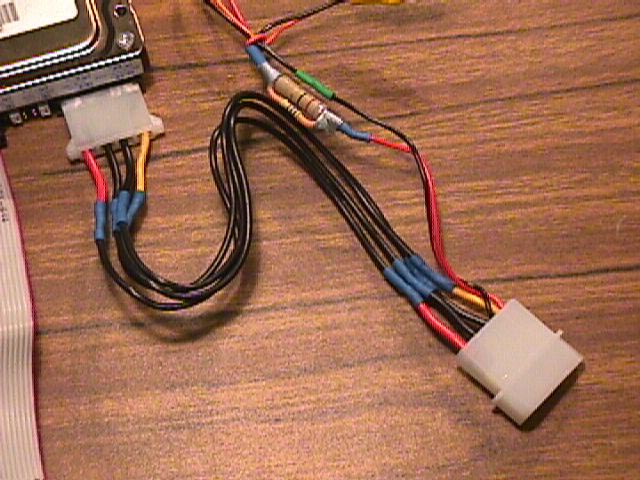
I used thinner than normal wires because this needs to fit between the lid and the case. Blue heatshrink surrounds the solder-joints. This is based on the cable which came with the fan. It is a hard-drive power receptacle and plug, with thin red and black wires running to the fan. The fan normally gets 12 volts, but I experimented with resistors to slow the fan as I chose. With this arrangement, the air is forced over the entire surface of the drive, and it doesn't need much air at all to keep it very close to ambient temperature. Centrifugal fans are very efficient and quiet, and they are particularly good at providing higher pressures at low flow rates, which is exactly what we want here. The aim is to keep the air inlet and outlet holes as small as possible - so these present a barrier to airflow which we must overcome.
In this instance I chose an 82 ohm 1 watt and a 150 ohm half watt resistor in parallel. Some fans are not so good at starting when running from a resistor, so a large capacitor (say 4,700 uF) across the resistor means that when the power is turned on, the fan gets the full 12 volts for a second or so while the capacitor charges up. Note that the resistor will dissipate a watt or so - so don't use 1/4 watt resistors unless they are in series or parallel. The resistor lives outside the case.
The wire going off to the right is for a LED indicator of fan rotation. I found that this particular fan had a tacho output on its printed circuit and I invented a system to create pulses for a LED on the PC's front panel (This one is in a robust Osborne 25 MHz 386 case which I really like. The machine is actually a Celeron 500 MHz.) The LED is labelled "Turbo" and it emits a weak flash for every cycle of motor operation (several per revolution, I guess). I won't go into how I did this, since the details are specific to each fan - and most fans probably don't have such a thing - though if you could access its circuit board, you could generate a LED pulse train with a few diodes, resistors and capacitors from any one of its magnet driver signals. The truly paranoid could rig up an acoustical warning if the fan failed to rotate.
I think the lubricant in these fans looked pretty good - but maybe I added some Loctite Super Lube for good measure. The fact that they are operating at a lower than normal speed (I guess a half or a third of normal) should make them last for a long time. Also I think the bearings of these fans would be well protected from dust, since they are in the middle of the centrifugal blower and air-pressure and dust would be greater on the perimeter.
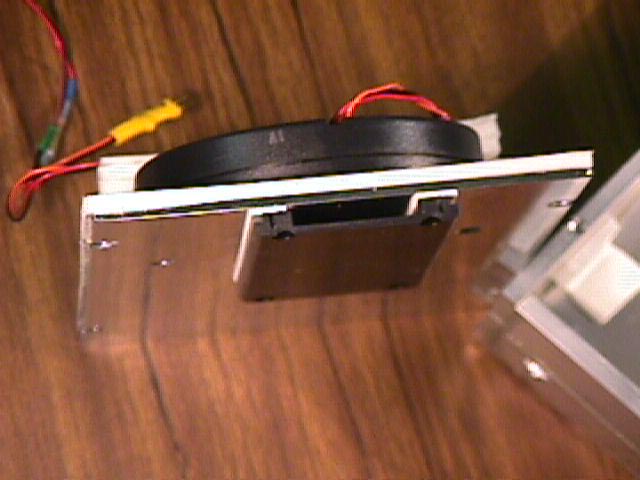
I mounted the fan with two short 1/8" Whitworth screws tapped into its plastic case. The three 9mm holes are the air intake.
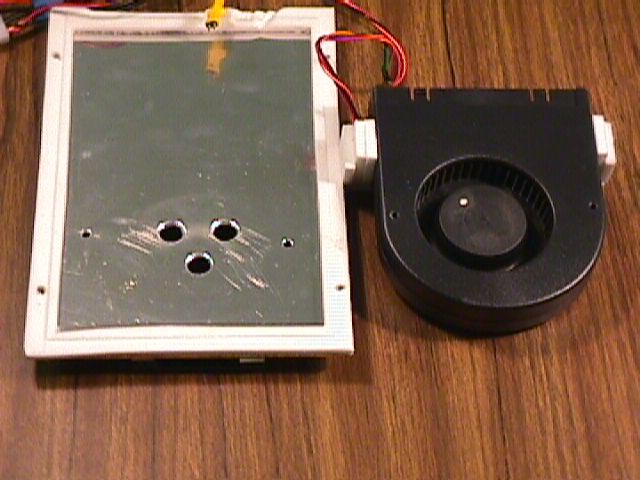
Here you can see the foam gasket which will seal the lid against he case. At the rear you can see where the data cable and the four power wires squash into the gasket. The air exit holes are at the opposite end to the cables.
I found there was still significant fan noise - and I guess a bit of hard drive noise - coming out of these three holes. A good solution was to mount a baffle over them. The baffle was the lid of a small plastic electronic case, with one end trimmed off and then mounted on double-sided adhesive foam tape. This greatly reduced the fan noise without obviously reducing air flow. Another way of looking at it was that it enabled a higher fan speed for a given level of noise. A higher fan speed is good because more air moves and the fan is (hopefully) more likely to run as it gets older. (However, extra rotation will make it age faster.)
Below is the fan mounted on the lid and the lid ready to go onto the case - with the hard drive sitting in place.
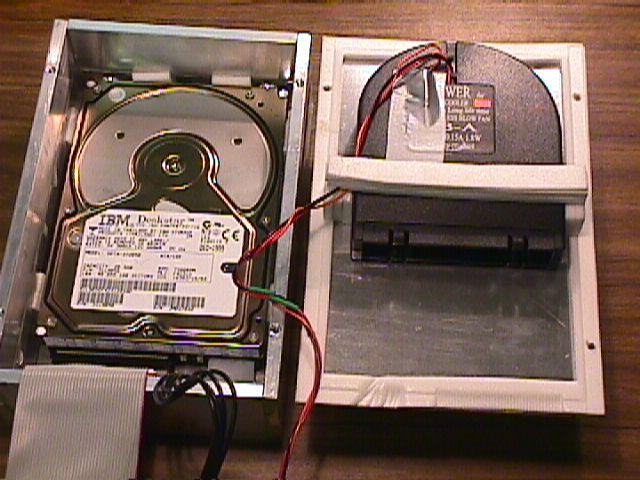
At the cable end, the only thing stopping hard drive movement towards that end is the power cable connector. I have built up foam with thin double-sided adhesive tape around the fan to achieve two things:
- A soft clamp to hold the drive in place against its other foam mounts.
- This clamp and further foam on either side of the fan
to ensure that the air from the fan must flow around the sides of the drive
and underneath it in order to reach the outlet holes which are just visible
at the far end of the case.
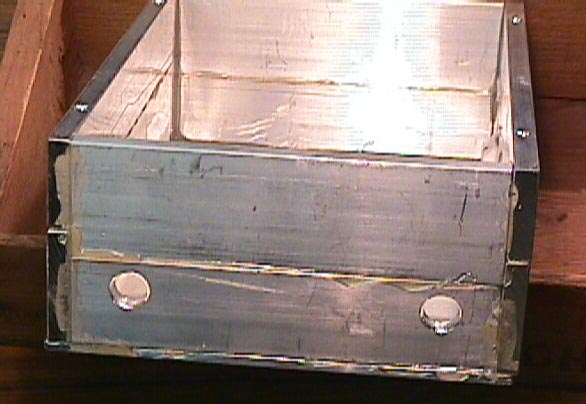
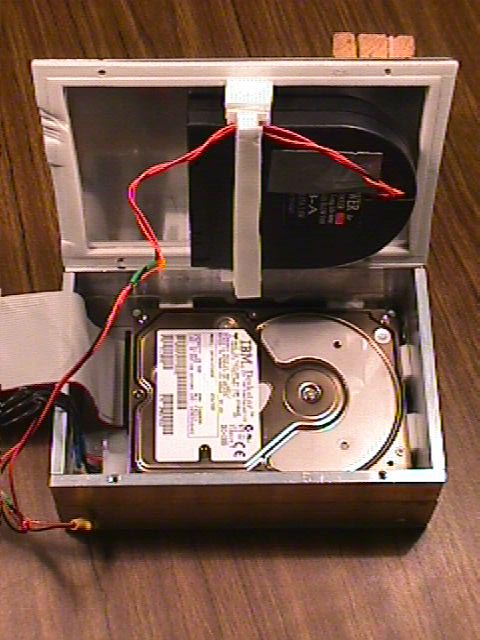
Here is the case and cover ready to be put together.
Finally, here is the competed case.
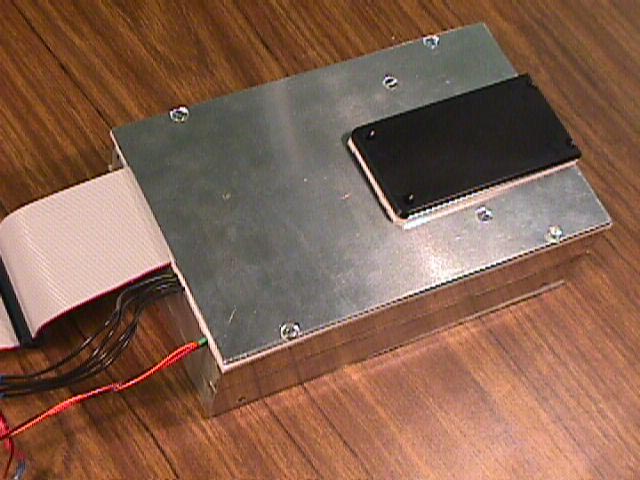
The final dimensions, not counting the baffle, are:
Length: 190 mm = 7.5"
Width: 122 mm = 4.8"
Height: 66 mm = 2.6"
The system works beautifully! Its hard to give impressions about sound levels - but I am very fussy and I am very happy! Two of these machines are under the table and one is on top. Having computers under the table certainly helps reduce the general impact of whatever sound they produce.
These drives dissipate about 6 watts. I am sure that a drive which dissipated a lot more than this would be fine, since the drive gets only vaguely warm compared to the air temperature inside the PC case.
This arrangement of the inlet being close to the outlet holes could be improved upon, for instance by making the baffle point in another direction.