TB-303 potentiometers -
../ to the Devil Fish
page.This page contains a few notes and photos concerning the six small pots of the TB-303. This concerns the original ALPS pots and some replacement pots from Technology Transplant from the mid-2000s until some time in 2009.
The material below does not apply to the bluish-silvery replacement pots from Technology Transplant from late 2009 onwards.
Please see ../303-mods/ for information on replacing the 6 small pots and other matters.
Robin Whittle. 2008-01-27
Updated 2008-08-17: bad wiper heights in the new pots and a better description of my test circuit.
ALPS pots
The original ALPS pots are no longer
available.
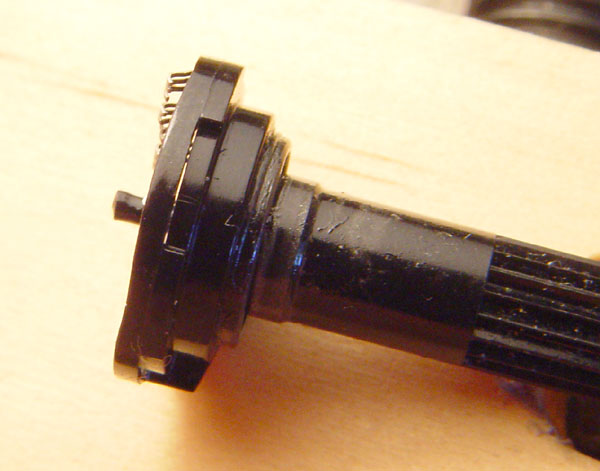
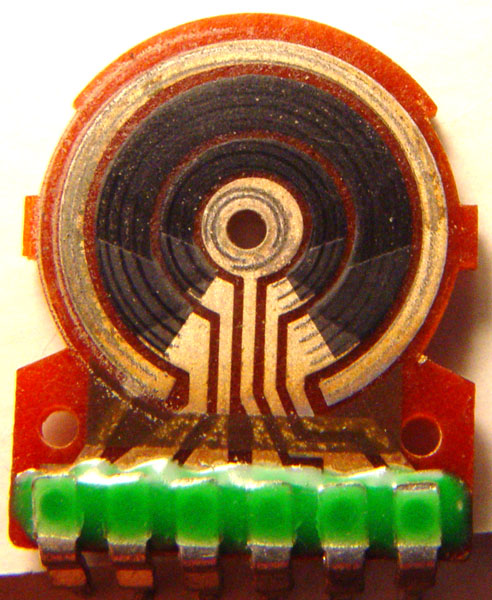
All the ALPS pots have a rotor with a rim around the edge. This is either to help keep out dust or for some other purpose, such as taking the strain of excessive downwards force on the shaft, which would otherwise be taken by the centre of the phenolic paper-board which holds the resistive and conductive tracks.
All the ALPS pots have a rotor with a rim around the edge. This is either to help keep out dust or for some other purpose, such as taking the strain of excessive downwards force on the shaft, which would otherwise be taken by the centre of the phenolic paper-board which holds the resistive and conductive tracks.
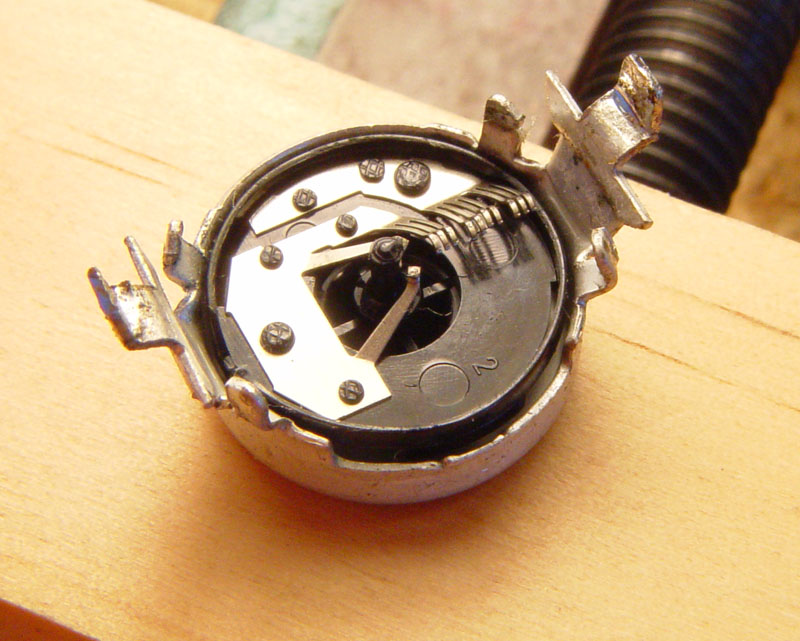
The
outer rim extends leftward in a slightly curved shape here, which is
also a spring, as evidenced by the gap between this section of the rim
and the rest of the rotor. This is from a resonance pot - a dual
50k log, so there are two sets of wipers.
Here is a general view of the same rotor, with the two sets of wipers.
Here is a general view of the same rotor, with the two sets of wipers.
Here
is the phenolic paper-board part of an ALPS resonance pot, with
some wear from this outer rim. This only happens when the shaft
is both turned and pressed downwards.
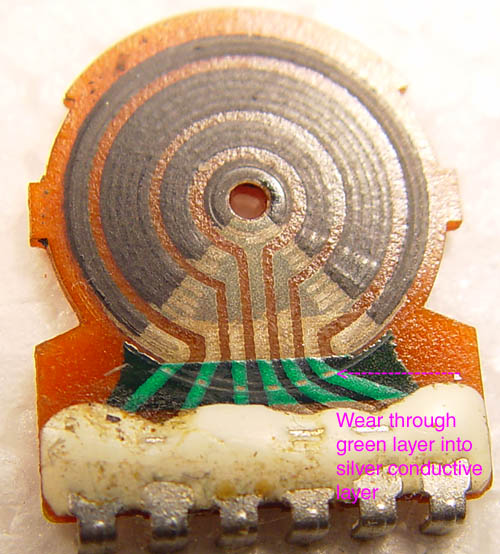
Not
all the ALPS pots have this white epoxy where the metal lugs are
riveted to the metal tracks. Those without it may be less
reliable, with open circuits developing between the lug and the track.
Starting from the outside we have:
Starting from the outside we have:
- Conductive
(metal base, with carbon on top for good connection to the wiper, I
guess) track for the outer pot. This connects to pin 1, and is
solely to connect to the outer part of the outer wiper (3 metal brushes
in the previous image).
- Resistive track of the outer pot,
pins 2 and 6.
- Resistive track of the inner pot, pins 3 and
5.
- Inner-most
circle - conductive track to connect to the inner wiper, via two
separate metal brushes. Note this is largely, but not entirely,
coated in carbon.
Here are some extreme cases of pot wear. I don't know exactly how this occurred, but there must have been a lot of turning and pushing to cut through the tracks like this. This must have continued well after the pot failed electrically. Perhaps someone was hoping to make them come good!
"Scratchy" pots in a device which has not been used for years can be caused by a thin film of grease on the conductive and/or resistive tracks. I find this can often be made to go away by turning the pot a few dozen or maybe a hundred times. However, at least with these ALPS pots, please don't push on the shaft when you do this!
By
the way, there is very little trouble with the ALPS volume and tempo
pots. Replacements are available from Technologytransplant.com,
as noted
below.
Moving the knobs up a little
Before
affixing the knobs, I insert a 6mm disc of leather inside the knob.
This means the knob sits about 1.2mm to 1.5mm higher than normal.
This makes the knob easier to grasp and reduces the likelihood of
unwanted downward pressure and wear of the case around the knob.
I also use a little Blu-Tack (poster putty) in the knob to stop them falling off.
Do not glue knobs onto the shafts!
I also use a little Blu-Tack (poster putty) in the knob to stop them falling off.
Do not glue knobs onto the shafts!
Don't Don't Don't . . .
Don't
spray anything in or on pots and switches unless you really know
what you are doing. My life has been complete without having to
do this (apart from a little alcohol in one or two isolated cases).
It seems to be common to spray oily things into pots and
switches - just because stores sell spray cans full of oily stuff with
claims that this stuff will fix electrical problems. This is very
a bad idea.
New pots from Chipforbrains - AKA technologytransplant.com
Without
these pots, we would be in trouble. Despite the difficulties
noted here, I am very grateful that these pots have been manufactured
and made available. They are available only in sets of
six. Likewise, pots for the TR-606 are also available, though I
haven't used any of them yet.
This information may not be relevant to the pots currently on sale. Below I refer to pots I purchased in 2006 and in early 2008. There were some earlier versions of the pots which I don't refer to here.
To purchase the pots, check in "Items for sale" at the (was Chipforbrains) Technologytransplant site:technologytransplant.com .
Apart from the Resonance pot, these do not have a rim around the edge of the rotor. So, apart from the Resonance pot, they should not suffer from the problem of cut tracks due to downwards pressure.
In my experience the pots have been good, except for the problems described below for the Resonance pots. I think the friction grease on these pots can be rather stiff. This is grease between the shaft and the metal case, not near the conductive tracks. I can dismantle the pots and replace the grease with low-friction silicone grease. This gives very little resistance to moving, which is unusual in pots, but I think is good for easy turning for musical purposes.
One thing to watch is soldering the two metal mounting tags of each pot. Some earlier versions of these replacement pots had cadmium plated (I think) tags, which were very hard to solder to. The current production is plated with something else and is easier to solder. It might be best to file away the plating on both sides and the edges and to use a high-powered soldering iron. These tags are more than mechanical. In the TB-303 they carry Ground to various parts of the circuit. The machine will not work unless all the pots are soldered in to complete these ground circuits.
It can be difficult to solder the pots in exactly the right orientation so that the knobs do not brush against the case. It may be necessary to melt the joints and press against the pot shafts to slightly change their orientation once you have found a scraping knob problem. The latter is only apparent after the back has been screwed on and the knobs put on.
Resonance pot problems
Shaft splines too large
The first problem is that the shafts of these pots are too large to fit comfortably into TB-303 knobs. There is no prospect of filing the shaft down - the splines are numerous and the material is hard nylon, or something similar. Filing would just make a mess.There seem to be two flavours of knob - some with a larger hole. These can be found in the one machine, as if some parts from the mold are to one pattern and the rest to another.
Sometimes one of these larger hole knobs can be pressed onto the Resonance pot shaft, but it can be very hard to get off.
That is not such a problem with a TB-303, since the knob can be forced off with pliers, levers etc. from below, pressing against the metal body of the pot, once the case has been removed.
For a Devil Fish, this is not possible. The knob has to be removed before the case can be removed. It can be tricky to hold the knob with enough force, for instance when using adhesive tape to grip the knob. So forcing a knob onto a larger shaft would lead to serious trouble the next time the machine needs to be dismantled.
My usual solution to this problem is to drill the knob almost down to the bottom of the spline with a nice sharp hand-held (in a chuck) 15/64" drill bit. Then the knob will fit OK, with enough spline left to lock it against the shaft and stop rotation. The splines in the knobs seem to be narrower at the bottom of the knob than the top, inside the knob.
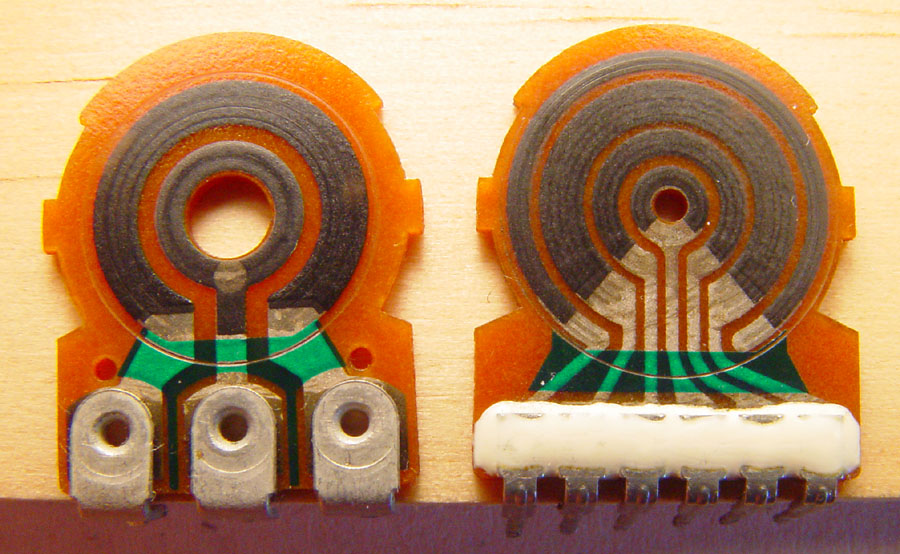
Not linear
The second problem is that the pots are not linear. They have a "logarithmic" taper at both ends of the rotation. This can be seen by the thicker layers of resistive material printed at both ends of the resistive track: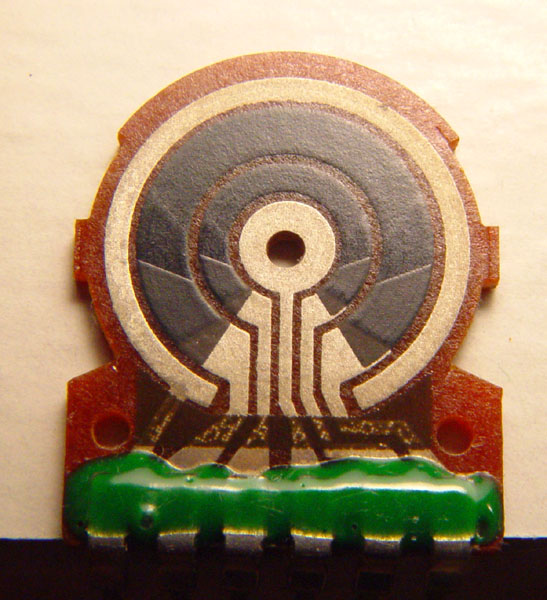
It
looks like layer 1 is printed first, to about 10 and 2 o'clock.
Then the main resistive track is printed, followed by a third low
resistance track to about 9 and 3 o'clock.
The result is that most of the range is between 10 and 2 o'clock - rather than 8 to 4 o'clock in the ALPS pots. This doesn't change the sound of the Devil Fish or TB-303. It only affects what position the knob must be in to achieve a particular sound.
Pin functions:
The result is that most of the range is between 10 and 2 o'clock - rather than 8 to 4 o'clock in the ALPS pots. This doesn't change the sound of the Devil Fish or TB-303. It only affects what position the knob must be in to achieve a particular sound.
Pin functions:
1 Outer wiper
2 Outer ACW
3 Inner ACW
4 Inner wiper
5 Outer CW
6 Outer CW
2 Outer ACW
3 Inner ACW
4 Inner wiper
5 Outer CW
6 Outer CW
Some replacement resonance pots have failed due to "scratchiness"
The problem may only affect one batch of pots, or a few individual pots, so it doesn't necessarily mean that other Resonance pots are bad.I
think the problem is primarily or solely that the wiper for the outer
section of the pot is not shaped correctly, and so does not make proper
contact. A secondary problem may be a kind of coating over the
resistive tracks, but this may not in fact be a problem at all.
I have a test jig to test the connectivity of the wipers. The ACW and CW ends of both pots go to ground. Both wipers go to +12V via 33k resistors. A 100k from each wiper takes the voltage from each wiper and mixes it to a common point, where a 0.22uF cap takes it to the CRO, the audio amp, and a 1M to ground.
Turning the pot produces audible noise as the wiper fingers find their way across bumps in the tracks, with different voltages.
If there is a problem with wipers not touching the track - the problem I am trying to fix - then there is a much harsher noise and sharp transient voltages can clearly be seen on the CRO.
Note how the outer and inner conductive tracks are plain metallic tracks. In the original ALPS pots (the first photo above) they are metallic tracks for low resistance, topped with a carbon track, except for one sector of the central track. I assume ALPS know that this is a better surface for the wipers. ALPS know a lot about pots. The little RK09K113 pots used on the Devil Fish boards have never (to my knowledge) failed, despite the hard work they have done, in some machines since 1993.
I wonder whether these metallic tracks will wear away faster than the carbon.
I wonder whether they will corrode over time. If they do, we are in trouble . . .
At first I assumed the problem described below was due to some kind of residue remaining on the surface of the conductive tracks after manufacture. Therefore, if it is fixed, the pot should be fine for a long time. If it is a corrosion problem, then the trouble might re-appear.
I
was able to get rid of the grey-brown blotchy contamination on the
outer conductive
track by wiping with ethyl alcohol (methylated spirits). It came
off quickly, leaving a clean metallic track. Then the pot worked
perfectly . . . but the real problem is probably due to wiper fingers,
as described below.
There is a bluish-purplish tinge on the lower right - that is oxidation from some oven step in the manufacturing process. That was not affected by the alcohol and does not seem to be a cause of the trouble.
Important update 2008-08-17
This contamination is not the only problem causing scratchiness. Perhaps it is not a problem at all. There was a bad case of scratchiness with a pot I had dismantled and cleaned.
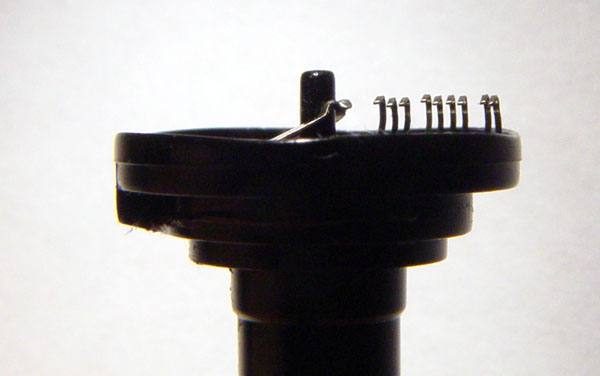
The outer pot has 4 inner wipers for the conductive element and 2 for the outer metallised track.
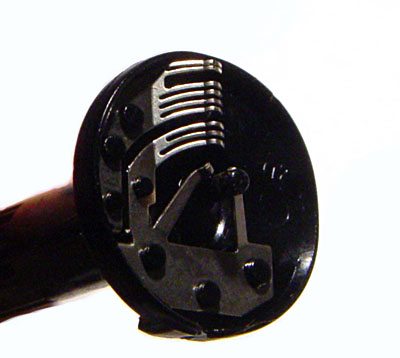
There seems to be a problem with these pots that the four inner wipers are not as extended towards the conductive track as the two outer wipers. Since they share a common base, and since this base may not be pressed hard against the rotor when we look at the height of these wipers, there can be a serious problem which definitely causes scratchiness:
The fix is to bend the 4 inner wipers away from the rotor until they are about as extended as the 2 outer wipers.
Here are the wipers in their original state. Note the set of 4 which is slightly lower. (This would be "higher" in the final orientation of the pot in the TB-303, since in these photos the shaft is downwards while in the TB-303, the shaft is upwards.)
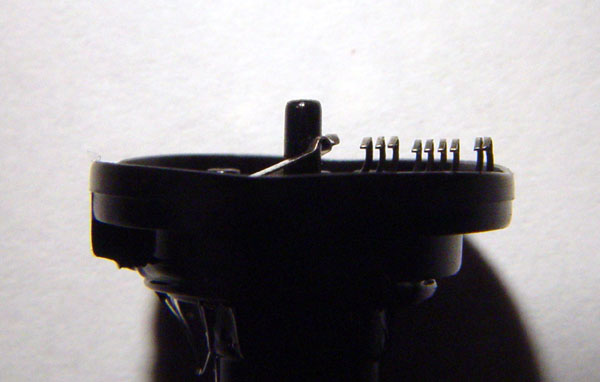
Below, after I bent them all upwards a little, especially the 4 wipers of the outer resistance track.
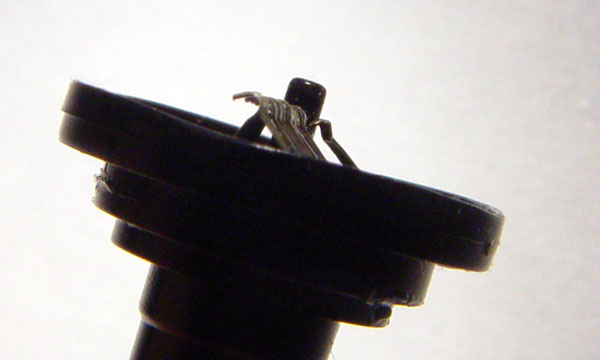
This appears to solve the problem.
There is a bluish-purplish tinge on the lower right - that is oxidation from some oven step in the manufacturing process. That was not affected by the alcohol and does not seem to be a cause of the trouble.
Important update 2008-08-17
This contamination is not the only problem causing scratchiness. Perhaps it is not a problem at all. There was a bad case of scratchiness with a pot I had dismantled and cleaned.
The outer pot has 4 inner wipers for the conductive element and 2 for the outer metallised track.
There seems to be a problem with these pots that the four inner wipers are not as extended towards the conductive track as the two outer wipers. Since they share a common base, and since this base may not be pressed hard against the rotor when we look at the height of these wipers, there can be a serious problem which definitely causes scratchiness:
The outer 2 wipers, being more
extended,
push the whole base away from the tracks, taking the base of the 4
inner wipers away, and so reducing the pressure these 4 inner wipers
place on the resistive track.
The fix is to bend the 4 inner wipers away from the rotor until they are about as extended as the 2 outer wipers.
Here are the wipers in their original state. Note the set of 4 which is slightly lower. (This would be "higher" in the final orientation of the pot in the TB-303, since in these photos the shaft is downwards while in the TB-303, the shaft is upwards.)
Below, after I bent them all upwards a little, especially the 4 wipers of the outer resistance track.
This appears to solve the problem.